
This is a big topic on which much is already written, many opinions held, and where personal preferences reign. So here’s my two cents’ worth, though what works for me may not for you. See also my clothing page for other sorts of gear.
Page Contents
Choosing Gear
Gear List
Packs
Tents
Sleeping Gear
Hiking Poles
Cooking
Electronics
Minor Items
Equipment Suppliers
Choosing Gear
First of all, consider weight. On a regular hiking trip you will probably walk five or six hours, and for only a few days, so you don’t have to put up with a heavy pack for long. But that all changes on the TA. Now you will be walking around eight hours every day for months. A heavy pack can strain your body, increase the risk of injury, and make your experience miserable. So pare back weight as much as you can. Check out lightweight hiking websites. Think about the stuff you really need vs the simply nice-to-have. Do you really need a book? Liquid shampoo? A sheath knife? An inflatable pillow? A coffee brewer? Detergent? More than one cooking or eating container? Get some scales and weigh every single item so you see how much each contributes to the total. A 150g T-shirt, cellphone, or whatever don’t seem like much on their own, but they quickly add up.
A 2013 MSc thesis¹ that surveyed hikers on the Appalachian Trail found hikers with lighter pack weights tended to be finishers, and all hikers progressively lightened their packs as they discarded stuff they realised they didn’t really need. The conclusion was that you shouldn’t carry more than 20% of your body weight, with a maximum for any person of 30 lb (13.6 kg). The average pack weight for completers was 18% of body weight. Pack weight also correlated with back, shoulder and torso injury.
But what else to consider besides weight? Here are my seven criteria:
- Cost
- Ruggedness
- Weight
- Frequency of use
- Comfort value
- Safety value
- Multi-use
It is worth checking each item of gear you are thinking about taking against these, but also if you are weighing up (no pun intended) two or more options, such as which type of tent to take. Generally, lighter-weight gear is going to cost more and be less hard-wearing. And the less gear you carry, the more you are sacrificing comfort and possibly safety.
You should put the greatest gear selection care into those things you are going to use the most. If you are tossing up between two packs and the one you like costs more, don’t worry about the price: that pack will be on your back every single day. But if you are only going to use a tent half a dozen times then why spend a lot on one, or worry about its comfort level? Weight then becomes more important because you are still carrying it every day. Of course, there are some things like a personal locator beacon or first-aid supplies that you hope you will never use at all, but that doesn’t mean you shouldn’t take them, so that’s where the safety value comes in.
Another thing to consider is whether you can use one item for multiple purposes (a towel for a scarf, or a cooking pot for eating out of, say) and reduce the amount you carry that way. Not many things fall into that category, but walking poles that serve as tent poles (see below) is a major one. And I eat out of a lidded food storage container that I also use to carry squashable food.
Gear List
Before getting into discussing some specific items, I’m going to put my gear list out there, but as I say, personal preference does come into it a lot. My pack base weight in the South Island was 7.4 kg (16.3 lb). In practice, I was carrying about 10.2 kg on my back including food and water at the start of each section, though I did often start off sections with some heavy fresh food, so maybe it was a bit more than that. I think this is fairly light, due in part to a light tent, sleeping bag, sleeping mat, cooking gear and, once I’d eaten the freshies, food. But let me say that the tent wouldn’t have stood up to a storm, I was freezing in my sleeping bag on several nights, and the sleeping mat wasn’t as comfortable as inflatable ones. So another kg would have seen me a lot more comfortable. Still, there are people who go way lighter than my 7.4 kg base weight. I’d heard of 4.5kg and thought that was impossible without extreme hardship until I managed to pare my own down to 4.7 kg for the North Island TA. That was the result of a new, lighter pack, no cooker, a lighter parka, no waterproof pants, and fewer warm clothes. If I’d left out a book I would have been very close to 4.5 kg.
You can download my gear list as a spreadsheet and use it to add in your own gear. I’ve placed the South Island and North Island lists side-by-side so you can see where I’ve saved weight. If you are doing both islands then you certainly have an opportunity to shed some of your warmer clothes as you get into the upper North Island.
Packs – Weight Saving Starts Here
The first thing is to figure out what capacity you want. It will probably be smaller than the typical NZ tramping pack, since you should be carrying less. A shop assistant may not understand this requirement of long-distance walking. The other factor is your body size. A smaller person can not only carry less but their gear will be smaller and they will be eating less than a larger person, so they won’t need a big pack. For an average-sized person I wouldn’t go over 50 litres on the one hand and not too much below 40 litres on the other.
Osprey Packs
Most regular packs are heavy, so you should choose your pack carefully. I carried the Osprey Talon 44, as that was the lightest you could buy in New Zealand in 2016. It was about 1100g, but is now listed as weighing 1570g for the small/medium! (At least, that is the weight on the Osprey company site, but the weight varies on different retailers’ sites.) There is a women’s version called the Tempest, with the same size and weight. Forty-four litres is small by Kiwi tramping standards, but you are supposed to be cutting back on carrying all that stuff you don’t really need, remember? I found the Talon 44 fine for size myself, and it wore well, but on the longest section, over the Richmond Range, where I had to carry about nine days’ worth of food, it was full to bursting point. My only other complaint was that the pack seemed to be losing its waterproofing (or water resistance), especially on the lid, after walking the South Island with it. Perhaps this was due to the effects of sunlight, or maybe just constant handling and abrasion.
To confuse things, there are now ‘Pro’ versions of the Talon and Tempest. I believe that a slightly more waterproof fabric has been used on the Pro. The top pocket and hip pocket zips are now also waterproofed. The hip pockets remain too small to house a cellphone though. The sleeping bag zip, a fairly useless feature on a small pack, has been eliminated from the Talon/Tempest 44 on the Pro version. The total weight is reduced by about 100g.
I think the best Osprey option as at late 2025 is the Exos 48 Ultralight (female version Eja), a 48L pack weighing 1255 to 1294 g, depending on size (and 45g lighter for the Eja). This has been popular overseas with long-distance walkers in the US and elsewhere for some time, due to its balance of features (including suspended back mesh), weight and price, and it is now finally being sold in NZ. Its features are pretty similar to the Talon/Tempest. There is a 38 L version apparently not sold in NZ, but it is only a few grams lighter, so not really worth considering. However, what is available is again a Pro version of these packs, at 55L, a substantial 300g lighter (the fabric is thinner, and so less robust, but more waterproof, and I believe that the frame is lighter and less rigid) and about $100 more expensive. If you want a light, largish, framed pack, this might be the one, but I would prefer it smaller. You can read a review at SectionHiker.com.
NZ and Australian Packs: Kathmandu and Macpac
Kathmandu’s current standard pack is the Valorous in unisex and women’s versions at 38L and weighing 1220g, 48L at 1580g and 58L at 1750g (that’s for unisex – women’s are slightly smaller and lighter). 38L is on the smallish side, so it allows no room for luxuries, and 48L is getting too heavy. I wouldn’t even consider a pack at 1750g (the 58L one). Good points are that it is one of the few packs with hip pockets big enough to take a cellphone. They are zipped too. It also has deep side and front pockets. Assuming they were not calculated into the number of litres, then these all add extra capacity. It also has a suspended (trampoline) harness for preventing your back getting wet from sweat, though it is not a very long one, and one shouldn’t think that these are a sure-fire way of keeping your back dry, though they help. Its hip belt is a stonking, great padded thing which probably feels very comfy. Downsides are weight and a non-waterproof top-pocket zip, though at least all that will get wet if rain leaks through will be inside the top pocket.
In January 2022, Macpac released a new pack they said had been tested and refined on the TA! It came in 30, 40 and 50L versions and male (Hesper) and female (Harper) as well. The 40L ones were 1020g and 1010g male and female respectively. These have been discontinued and now we have just the 50L Harper (1150g) and 52L Hesper (1170g) and 30L versions. The frame, lid and hip belt are all removeable on these larger ones. Taking the first three items off the 50L Harper would leave you with a pack weighing just 760g. Though you probably wouldn’t. And even if you did, you would want to replace the hip belt with a plain belt at 50g or so at least. The hip pockets are uselessly small (70 x 120mm) and are not zipped, though I think you can get a belt option where one is zipped. You could fit a muesli bar and a very small amount of scroggin in them, but not a cellphone and probably not a map (which risks falling out anyway). There is a small, detachable sock-like pocket on the shoulder harness though. It is intended for a small water bottle, but you could put sunglasses or a cellphone into it. It is a pity that more manufacturers don’t do this. Note that the open-top side and front pockets used on these and many other packs can accumulate water which then leaks through seams into the pack. Some manufacturers put drain holes on this sort of pocket, and Macpac has done a nice job here. Another thoughtful touch is the rain-protected zip on the top pocket. One gripe I have with these (and many other) packs though is fabric colour. Guess what? These are made only in the beloved black of Kiwis. Given the amount of road walking on the TA, wouldn’t you think that packs that were ‘tested and refined’ on the TA would consider road safety and be made of bright colours for visibility??? And even have reflectorised patches or trim? And consider what happens to perishable food stored in a black pack on a sunny day?
Following the release of the Hesper and Harper, Macpac put out two packs titled Te Araroa packs at 60L (mens) and 55L (women), weighing 1530g and 1460g respectively. As at Oct 2025 you can only buy the women’s one on clearance. I think these packs were too heavy though. Not sure why they made them.
However, there is the Volta at 52L and 1350g that is based on the Hesper, but has a trampoline back panel to minimise your back getting sweaty. Unlike the Harper/Hesper, it has a fixed hipbelt. And also unlike them, its hipbelt pockets are zipped. And it comes in two colours besides black.
Another Macpac pack you might consider is their climbing pack, the 40L Pursuit. It is frameless and weighs 1010g. It is very pared back though and has no external pockets, except one on the lid with a zip that isn’t protected from rain. It is designed to be very rugged. I bought a version of this pack they made with the incredibly light and strong Dyneema fabric in 2017. That weighed just 610g. I wove a net across the front between the attachment points so I could store a water bottle externally (it’s always best to avoid carrying liquids inside a pack in case the bottle top leaks). I just loved its light weight, and the lack of a hip belt wasn’t an issue at all with light loads. Some rain water did come in through the zips, however.
Arn Pack: New Zealand Innovation
Then there is the Aarn pack, a novel pack system invented in this country that spreads the load between your front and back so strain on your back is relieved and energy is saved. When I last reported on these, the lightweight Featherlight one was 1700g to 1900g all-up, but now seems to be just 1256g (or 1210g for the Dyneema Pro version), so definitely worth investigating further (does this weight include the front pockets, which weigh 250g or so though?) I’m sure these packs are good for heavier loads, but once you get into the ultralight realm of hiking then load distribution becomes less important in my view.
New Entrants in NZ
Rab and Black Diamond have now come to the lightweight pack party. Rab have the Muon 50 Hiking Pack and the Muon 40 Hiking Pack, at 50 and 40 litres respectively, with both weighing just under 1 kg and costing about the same. You can get them at Dwights Outdoors, Gearshop NZ, Pack Gear Go and other places. Both are fully featured packs – that is, they have frames and padded hipbelts. You don’t often get a framed pack under 1 kg. Besides volume, the two packs differ in their tops. The 50L Muon has a detachable ‘brain’, a top compartment with a zip at the back and underneath, like the Osprey Talon 44. The 40L one is simply a roll top. Both also have running-style shoulder straps for stability – wide and with multi-connecting-point chest stabilisers (which reviewers have considered too fiddly). The straps have really decent-sized pockets but the hip belt has none. One of each would have been better. A major issue with the packs is the side pockets that are so shallow and angled forward (for pulling out your water bottle while on the move) that said bottles are likely to fall out any time you bend over. I’m not sure what they were thinking here.
The Black Diamond Beta Light 45 also has running-style shoulder straps. It weighs 890g, but can be stripped to 512g. It uses a (removable) stiff sheet down the back instead of a frame. It is reviewed at Outdoor Gear Lab in its ultralight hiking packs review. They measured the capacity at 40L internal and 10L external, and commented that it is expensive, which it certainly is here in NZ.
Ultralight Packs
I’ve spent some time on the above packs because they are what Kiwis can readily buy (and try on) in New Zealand. But there are lighter ones specifically designed for long-distance hiking that you can buy online, and in a few cases, in-store in NZ. See the ultralight backpacking section of SectionHiker for example, and ultralight packs at Backcountry Gear or Hyperlite Mountain Gear for reviews and commentary on these packs. But while you may be able to save 200 grams, and sometimes a lot more, there will probably be a trade-off in comfort and functionality, not to mention a higher price. Note that the very lightest ones don’t have frames, so require very careful packing and light loads to be comfortable. There is a review of some ultralight backpacks on Outdoor Gear Lab. The packs here average between 40 and 55 L, and weigh around 850g. The top-rated and exceptionally light Z-Packs Arc Haul Ultra 50L weighs just 613g but costs USD $400, plus around US $30 shipping, so NZD cost is well over $700. Compare that to the $250 to $300 you would pay on buying a pack in New Zealand during sales. Having said that, I bought the 38L Z-Packs Nero that weighs a mere 316g for USD $250 + freight. It is a pretty uncompromising pack though and you will probably want some add-on accessories (more weight!) and be prepared to super refine your gear. Its low weight more than compensates its lack of convenience features in my view. However, I would caution that, in common with many of the ultralight packs, its lightweight fabric means that it is less robust. In particular, the bottom of my pack is abrading, as it is not reinforced here, so you have to put it down very carefully. Most ultralightweight packs have to be purchased online from the USA or elsewhere, but Pack Gear Go and Coffee Outdoors in NZ have a selection. Note also that lightweight packs are now being made on a very small scale, both in Australia by Orange Brown and Neve Gear and here in NZ by Fiordland Packs, Kiwi Ultralight and Southern Lite Packs.
Capacity Claims are Unreliable
Note that manufacturer’s claims for capacity can vary considerably from figures published by independent testers. Part of it may depend on whether external pockets are included in the capacity measurement or not, so comparing one pack to another requires a consistent measuring methodology. Osprey measures volume by adding only zipped external storage to internal capacity, which is how it should be calculated in my view.
Waterproofing
Lastly on packs, there is the issue of waterproofing. It is a fact of life that most packs will leak in sustained heavy rain. If you have a top pocket, the stuff in here will probably get wet. You can use a pack cover. Advantages are they cover the top pocket as well as the body of the pack; they sometimes come in bright colours (see cycle stores for fluoro green ones) which is great for being visible when road walking; once removed, the inside of your pack is very accessible; and they double to protect your pack when being transported in buses, planes, etc. Downsides are they won’t keep the pack dry, or floating, if you fall over in a river, and they weigh a bit. A pack liner, or at least a good, well-sealed one, will keep your gear dry if you fall in a river, but it can make accessing things in the pack a faff, sooner or later you will probably start getting holes in it, and there is the weight issue again. If you are going to use a pack liner, see if you can get hold of a Nylofume bag (weighs 27g) rather than a rubbish bag or one of those heavy Mountain Safety bags. They are light, strong, and don’t cost much. Coffee Outdoors and Pack Gear Go sell them. An alternative is just to put the critical things – sleeping bag, down jacket, spare clothes, maps, cellphone, first aid gear, food that will be affected by water – in individual water-tight bags.
Summary
In summary, if buying in NZ I would look most closely at the Osprey Exos/Eja and the Macpac Hesper/Harper packs. The Osprey Talon/Tempest now looks too heavy to me. The Macpac Te Araroa packs are quite expensive, as are the Arn packs, but it would be worth checking the latter out. And if you want to get really serious about saving weight then you can also consider buying other brands of more exotic lightweight packs from the USA that are specifically made for long trail hiking.
Tents
A tent is another heavy item where you should pay attention to weight. You can get away with not camping very often on the South Island TA, so there is no point carrying a large, heavy tent if you are just doing this island when you might use it only 7 or 8 times. In fact, with careful planning, spending more than average on accommodation, and maybe good luck, you might be able to avoid camping entirely in the South Island. But don’t get too confident. An issue to consider is backcountry huts, camping ground cabins and backpacker hostels being full at peak season. You can get round this by going off-peak and booking well ahead but then there are still specific spots where camping is difficult to avoid: in Canterbury, at Lake Middleton (stay at expensive Ohau Lodge or sleep under the stars?); and Harper Village (no easy alternative, unless you choose not to walk from Lake Coleridge Village to Harper and catch a ride instead, or sleep out); and in Marlborough-Nelson at Pelorus River (sleep out or hitch/bus to Havelock to stay and hitch/bus back next day?) The North Island is a different kettle of fish though, and there you can expect to be camping quite often and come to appreciate the benefits of having a good tent.
Saving Weight
First off, note that quoted weights for tents have to be read carefully. Often you see two weights, the minimum or stripped weight, and the packed or trail weight. In the case of a double-wall tent the minimum weight will be just the fly, poles and guy lines (perhaps). To my mind, the trail weight should include everything for the standard tent set-up, including the floor and fly (if these are separate items), the tent bag, guy ropes and pegs, but some manufacturers leave the pegs up to you to supply.
A conventional, double-wall tent with a bathtub floor and its own tent poles is a fairly heavy beast. Even the ones claimed as lightweight, like Macpac’s Sololight or the Nemo Hornet, are over 1kg. So you need to get out of the regular camping tent mindset. Weight can be saved by a design that uses hiking poles instead of tent poles, and by going to a single-wall. These two features are pretty much standard for long-distance hiking tents now. The downside of single-wall tents is condensation. It’s not much fun waking up in the morning to find the inside of the tent wall wet, especially when you bump against it, and having to dry it out before you can pitch it again. But you can try and minimise condensation by keeping the tent door partially open, camping under trees, and avoiding sheltered hollows. A lightweight cloth like a Chux Superwipe can be handy to wipe off condensation before you pack up the tent. A double-wall tent might seem like a more comfortable option then, and often it is, but bear in mind that it will also be smaller inside for the same footprint than a single-wall (and to compensate for this, the tent has to be bigger overall, which means more weight of fabric.)
If you have gone with a single-wall to save weight, consider also whether you need insect mesh, as this contributes more than a few grams. My experience has been that while campsites can be swarming with sandflies in the South Island, they do go to bed at night. And while you will get mosquitoes in the North Island north of about Hamilton, they are not fierce, and you can put a shirt or something over your head when sleeping. Or if you have a silk sleeping bag liner, burrow down so it covers your head.
The last weight saver is foregoing a bathtub-style floor and just using a groundsheet, with the risk that water might splash or even flow in under the edges of the tent. Site selection is important again, as good drainage then is key. Sleeping away from the side where the rain might be coming from also helps. For a groundsheet, two alternatives are commonly used. The lightest is Polycryo (cross-linked polyolefin), which you can buy as window insulating material. Bunnings sell it as 3M ‘Window Insulator Kit’. A piece 1m x 2.5m weighs about 50g. A possible alternative that weighs the same is one of those silver survival blankets you can buy at outdoor stores. The reflectorised coating might add some warmth, but it does rub off over time. But significant downsides with both this stuff and Polycryo are that they are difficult to make lie flat in your tent and hard to fold up after use into a compact package. Both are very tough and far more puncture resistant than polythene sheeting such as painters’ drop sheets though. Even tougher, I believe, and somewhat easier to handle, is Nylofume, normally sold as pack liner bags, but you can get it in sheets (or you could join some cut-up bags).
The main alternative to Polycryo is Tyvek. It is about twice the weight, but still light, easy to fold and unfold, more comfortable to sit or lie on, and it is tear resistant. It is also white, so great for seeing all those small bits of gear you pulled out of your pack and scattered about. It may absorb some moisture if very wet underneath, requiring you to dry it out. It will also pick up dirt and debris if you put the matt-side down. There is a subtle difference in shine between the two sides: always put the shiny side down, as it is very hard to clean stuff off the matt side. Like Polycryo, Tyvek can be used as a groundsheet in addition to a bathtub inner to ensure against punctures and tears from rocks or sticks in the floor of an expensive tent.
Fabric Types
Speaking of fabric, before we go further, there are three types that tents are typically made from these days, ranging from the cheapest, polyester urethane (PU) coated nylon, through silicone coated (silnylon), which has a better strength for weight ratio, to the expensive but extremely light and strong fabric Dyneema Composite Fabric (DFC). You can read about the difference between PU and silnylon here and between nylon and DFC on the same website here. A key difference besides strength for the last two is that nylon will stretch. This can be a good thing in that it spreads tension over a large area rather than putting all the pressure on a single point like a guy line attachment, but not so good in that it may absorb water (depending on how waterproofed it is) and sag down into your living space. Also, Dyneema is not so abrasion resistant. So there is potential on both counts for a Dyneema tent to wear out more quickly.
Two Person Tents
Possibly the lightest-weight two-wall tent around is the Big Agnes Tiger Wall 2 Carbon. It has its own carbon fibre poles and uses very thin, and somewhat delicate fabric. It weighs 765g for the 2-person version. That’s an incredibly light 285g per person. Which brings me to qualify my dismissal of double-wall tents: for two people, the weight per person is not so bad, even for a 1 kg tent. The Tiger Wall 2 Carbon was very well reviewed on Outdoor GearLab in 2000, with some provisos, including fragility and cost. It is very expensive.
A-Frame Tents
Outdoor Gear Lab has loved the ZPack’s Duplex (and the Flex version with its own poles) since it first reviewed it in 2019, and still rates it as ‘the best single-wall ultralight tent’ in 2025. It has set the standard on long-distance US trails for years. It is made of Dyneema, accommodates two people, and comes with built-in bug mesh and a bathtub floor. The non-Flex, using hiking poles, is a traditional A-frame shape and weighs just 550g, excluding tent pegs. At USD $700 the non-Flex is also not cheap (NZ $1,400 incl NZ gst and freight as at October 2025), but it has a very low weight per person for two; or provides a spacious and still very light tent for one.
Other A-frame tents include Gossamer Gear’s ‘The One’ (for one person, 510g with bathtub floor and insect mesh at USD $255) and ‘The Two, (for two people naturally, 680g, USD $320). Both are available in more expensive but lighter Dyneema versions. You can buy these in Australia from Backpacking Light, and in NZ at Pack Gear Go, who both sell an extensive range of tents from many manufacturers. The 3F UL Lanshan 2 Pro (two person) is given a ‘best buy’ rating on Outdoor GearLab and is 1111g and only costs up to USD $197. Six Moon Designs Owyhee Backpacking Tarp (879g, 2 person) is also reviewed on this site: search for ‘best ultralight tent’. Arguably, A-frames are less able to stand up to strong winds than some other shapes, but a lot depends on the specifics of how a given tent is designed.
One A-frame you should definitely consider is the Durston X-Mid 1P. Outdoor Gear Lab claim it is ‘one of the best one-person trekking pole-style tents made in the Galaxy’. It is heavier than many other lightweight trekking pole tents at 720g, but reasonably priced. However, there is the Dyneema version, the ‘Pro’, at 440g, but costing in the vicinity of NZ $1,200. And what is really interesting is that the two-person version is not very much heavier, nor expensive, than the one-person. You can buy them in NZ at Pack Gear Go and Coffee Outdoors.
Going Solo
If you are going solo then around 500g is a point to aim for, though you may end up with 700 or 800g. Definitely stay under a kg. You will certainly be looking at a single-wall tent that uses hiking poles for support at these sorts of weights. Consider, for example, the DD Hammocks Superlight Tarp tent at 710g (plus pegs and guys) with insect mesh, a bathtub floor and vents, which you can buy in NZ from Gearshop for about $450. There are quite a few brands using this sort of design, such as the Chinese made 3F UL Gear Lanshan 1 Pro of a similar weight, but cheaper. Lighter and more expensive variants include Z-Packs’ Plexamid and Hexamid (433g and 274g) Dyneema tents.
These sorts of designs may be known as tarp tents or pyramid tents. They are very stable in the wind, but you do have to sleep on one side of the pole, which reduces the living space somewhat. Hyperlite Mountain Gear make some of these out of Dyneema, but they are very expensive. Substantially cheaper are those by Mountain Laurel Designs, such as their smallest, the Solomid. You can choose whether to have the fabric as Silnylon or Dyneema, at 410g vs 310g. A floor and insect mesh are extra.
Pyramid variants that are both (relatively) affordable and very light are the Deschutes Shelter from Six Moons (silnylon, USD $339, 368g), and the Hexamid Pocket Tarp with Doors from Z-Packs (Dyneema, USD $379, 157g). These are minimal shelters and neither has a floor nor insect mesh, but you can purchase add-ons or sleep in a bivvy bag.
Tarps
What we’ve been looking at above are more elaborate forms of tarp[aulin] tents. At its most basic, a tarp tent is just a single sheet of fabric, usually pitched in an inverted V between walking poles. But there are many ways of pitching a tarp, including having three edges on the ground in extreme conditions. The plain tarp is certainly the lightest way to go but remember that NZ weather is often windy and rainy, so a tarp shelter may not always be very comfortable. Some people sleep in a bivvy bag under a tarp, which prevents your sleeping bag from getting wet.
If you want to go minimalist via the plain tarp route then some of the better ones might be Hyperlite Mountain Gear Flat Tarp at 255 or 309g, depending on size. This is made of Dyneema, as is Z-Packs Square Flat Tarp, which is lighter at 221g but made of a less robust (i.e. thinner) grade of fabric. These will all set you back around the USD $369 to $400 mark. The Hyperlite and Z-Packs flat tarps have both been well reviewed by Outdoor GearLab. Cheaper options are tarps made from Silnylon, such as Sea To Summit’s Escapist 15D, which you can buy in NZ for about NZ $300. It weighs 300g for the medium version (without guys?) Rab ones could be worth looking at too.
Make Your Own
You could always just buy some Dyneema or Silnylon and make a tarp yourself, as it’s relatively straightforward. The cost of importing the fabric from the USA may negate some of the savings though. A supercheap alternative is to make it out of Polycryo. This guy made one about 2 x 3 m at 300g. It is clear plastic, so offers no privacy whatsoever of course and won’t last forever.
I made a very cheap and light tarp-style tunnel tent out of Tyvek weighing about 250g (plus pegs, plus Tyvek groundsheet = 535g total). That’s using the 43gsm lighter-weight variety rather than the Tyvek used by the building industry for wall lining. I would say that this stuff is a bit like canvas: breathable, and water resistant, but with dew or rain the fabric takes up water and when you brush the inside walls you get wet.
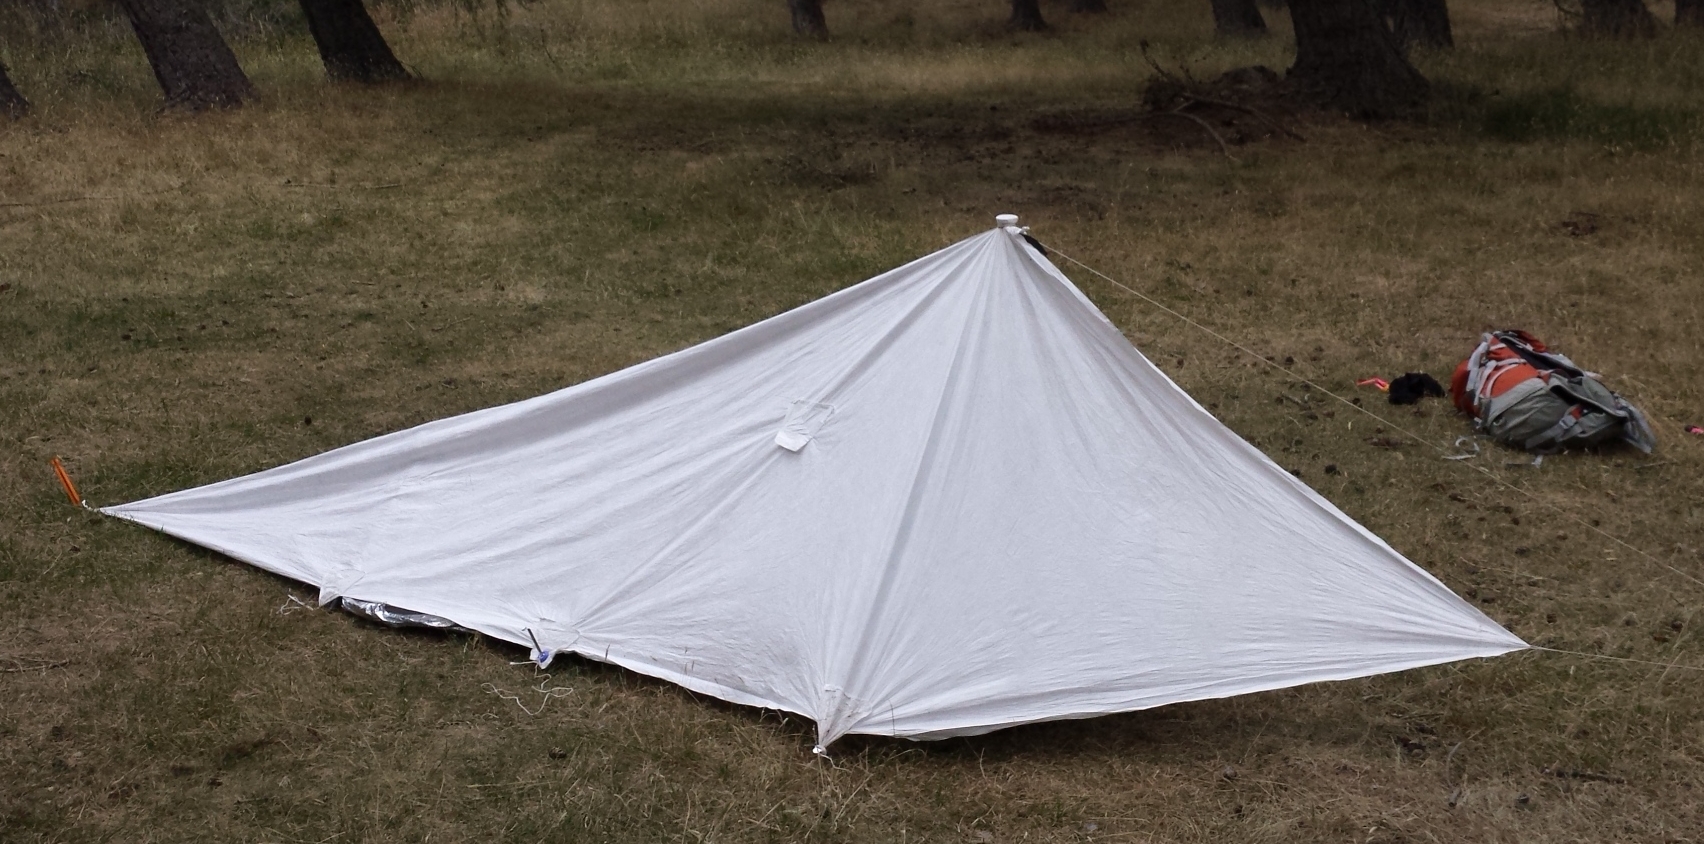 Home-made Tyvek tent, side view
Hammocks and Bivvy Bags
A few people have tried hammocks on the TA. These can be quite good in the New Zealand bush, as it is often very hard to find a flat, open space to pitch a tent, but bear in mind that large sections of the TA are in treeless areas, such as Otago and Canterbury and the Ninety Mile Beach. And camping grounds rarely have suitable trees, if any. In general, a hammock will probably limit your options. Bivvy bags are another thing a few people favour, but while they save a lot of weight, I can’t see them being a very pleasant experience in heavy rain. You will also have to figure out how to protect food in your pack from possums and rodents if it won’t fit inside your bivvy.
Sleeping Gear
Sleeping bag warmth
Go for lighter and compensate for lack of warmth on occasion by wearing some clothes to bed. In fact, note that the sleeping bag ratings you see under the international testing standard EN 13537 or its updated equivalent ISO 23537-1:2016 assume you are wearing long john underwear. You can read about how these ratings are devised and what they mean on Thermarest’s site here. Basically, they give a ‘comfort’ rating as the lowest temperature at which a ‘standard female’ can sleep in a comfortable and relaxed position. Why female? Well, because men, on average, can sleep comfortably at lower temperatures, so this temperature rating allows for those who feel the cold more. The next figure, the ‘limit’ temperature, is the lowest at which a male can sleep curled up without waking. So anything below this leaves most of us waking up with the cold and wanting to put more clothes on. The ‘extreme’ figure is, well, the lowest that might be survivable but definitely at a point where your life might be in danger from hypothermia. The terms ‘transition’ and ‘risk’ seem to be just ranges, where limit and extreme are the lower end of them.
You probably know this, but down bags are lighter than synthetic in terms of weight for warmth and, just as important, crush down much smaller in your pack. Goose down is warmer than duck, and the more down vs feathers the better (e.g. 90% down and 10% feathers). And the higher the ‘fill power’ (amount of loft, or fluffiness, the down is capable of), the better as well. There can be ethical issues with down (e.g. live plucking), so check that there is some sort of responsibility statement on how the down is sourced. Down works when it is dry and fluffed up, so don’t expect to have a warm bag by jumping into it straight after you’ve unpacked it. Shake the bag thoroughly to let the down expand. Also, because it will be absorbing your body moisture while you sleep, let your bag air as much as possible before and after using it. Always store down bags uncompressed at home.
Returning to the business of men and women feeling the cold differently, many bags are made in a women’s version to compensate for this. That is, they are made to be warmer. They will also have a different cut to allow for wider hips and narrower shoulders. This article on Section Hiker gives a good rundown of the differences.
Quilts
There is a trend for long-distance walkers in the US to take quilts rather than sleeping bags in order to save weight, but I have no experience of these myself. The theory is that the insulation on the underside of a regular sleeping bag just gets squashed by your body, so serves no useful purpose in keeping you warm and just adds weight. The idea with a quilt is that it works with an inflatable sleeping pad (often with an attachment system) so the pad does the work of keeping you warm on the underside. So if you are going with a quilt then you need to consider the pad’s dimensions and insulation rating as well to create an integrated system.
How a quilt would work with the standard bunk mattresses in a NZ backcountry hut I don’t know, and this may have something to do with why they haven’t taken off in NZ. I guess you need to put your air mattress on top. Note also that quilts don’t usually have a hood, so a warm hat or balaclava also need to be part of your sleep system. And they assume you are wearing some sort of clothing, as bare skin on many sleeping mats (not to mention the plastic-covered DoC mattresses in NZ huts) would not be especially comfortable. I believe that quilts are best suited for temperatures above zero degrees. Outdoor GearLab suggest that quilts are not necessarily lighter than the lightest sleeping bags, but can be more flexible in coping with a range of temperatures, as you can open them right out when it’s warm.
So far, I have only found a few quilts for sale in NZ: the Therm-a-Rest Vesper 0°C (weighs 460g and is rated as comfort 5°C, limit 0°) at Gearshop; Sierra Designs Nitro and Sea to Summit’s Ember (600g) at Further Faster and elsewhere and the Vesper -7 at Dwights Outdoors (539 g and costing over $1,000). Kiwi Ultralight manufacture quilts here in New Zealand in three temperature ratings and in pretty much any size you want. They also produce a light-weight fitted sheet for DoC mattresses! Sounds like an unnecessary luxury, but anyone who has experienced that sweaty, sticky plastic feeling of these mattresses may beg to differ. And they are the perfect match for a quilt in a DoC hut. Neve Gear in Australia also make quilts. Their Waratah 28 (635g) has been highly rated by Outdoor Gear Lab.
Lighter Weight Bags Available in NZ
Most sleeping bags sold in NZ are just too heavy. Go for the lighter ones and you won’t be so warm of course. So what is the optimum temperature rating for the TA? It has a lot to do with personal factors: your body mass, the heat you generate sleeping and how much you feel the cold. And with where you are sleeping: if you are camping a lot, I would get a warmer bag. I used a now-discontinued Kathmandu 710g bag rated as 5°C comfort, 0° ‘transition’ and -15° ‘limit’. On the one hand, I found it too hot in many backcountry huts (modern ones with decent insulation and perhaps other bodies warming the place up), but too cold camping in Otago and the Canterbury High Country (and in the uninsulated tin huts of Canterbury), where summer temperatures dropped to below zero at night.
My personal idea of a suitable bag for the TA would be one weighing around 500g (certainly not more than 700g), and (as a male) rated at around zero degrees limit. Scouring NZ stores in Oct 2025, some candidates include Therm-a-Rest’s Hyperion 0° (known as the Hyperion 32 in the USA for its Fahrenheit rating) that weighs 460g and has a comfort rating of 5° and limit of 0°. This is quite a narrow bag in the leg area, which saves weight but is not so suited to side sleepers. Weight is also saved by having only a half zip, so you can’t open the lower half if your feet are too hot. The Sierra Designs Nitro is 670g and rated at comfort 3° and limit -3°. The Sea to Summit Spark -1 is 493g and rated at comfort 4°, limit -1°. A similar model, with a half zipper, is reviewed on Outdoor Gear Lab, and all the Sea to Summit range come in women’s versions – see Further Faster for a good selection). And if you want to go really light, Mont Zero (available at Further Faster) produce the Zero Ultralight (comfort 12°, limit 6°, which weighs just 300g, the world’s lightest down bag with 1000+ fill power goose down they say. But a manufacturer I would look most closely at is One Planet. You can buy their bags at Dwights Outdoors, Living Simply and a few other outlets in NZ and a larger number in Australia. They have a really useful online chart too – oh, that other sleeping bag companies would do this as well, so you could read off the specs in a comparative way! Their Nitrous -1 weighs 541g, and its temperature specs are 4°/-1°/-16°. I bought one of these and it has been good so far. And the Nitrous series (there is a +2 and a -3 as well) all have full length, two-way zips and 800-850 down fill power.
For a general run-down on what to look for in a lightweight sleeping bag, Outdoor GearLab has a pretty good guide.
Staying warm in your bag
I’ve read that we feel cold most in the feet, hands, lower back, chest and nose and ears. The first and last two are where you lose heat readily, so the body will shut down blood supply to these areas. Warm socks are therefore a number one priority for staying warm in your bag. With our hands, we tend to tuck them in or under our body to keep warm, and with our chest, we might curl up or wrap our arms across it to stay warm. The lower back is less easily dealt with. I’ve never heard of anyone making or wearing a back warmer but it’s something I’m thinking about. Ditto nose warmers. But ears can be covered with a good hat. Try not to huddle your head so much into the hood of your bag that you are breathing into it, as that increases the moisture level inside, which reduces insulation. And where you sleep is important. For sleeping in a tent, avoid pitching it in hollows and other low-lying places, as cold air will lurk here. And under shelter, such as trees, will generally be warmer than out in the open (think of where you will expect to see dew or frost in the morning). The insulating power of your sleeping mat will play a major role in a tent, too. In a hut, I would anticipate the top bunks to be warmer than the bottom, especially with other bodies in the hut emitting heat. And finally, try to wear dry clothes to bed.
Sleeping mats
Inflatable mats are all the rage these days. They certainly offer a level of comfort undreamed of years ago, but they are expensive and heavy. The lightest is the Therm-a-Rest NeoAir Uberlite at 250g for the medium size, but it’s not cheap (about NZ $500) and its insulating value is relatively low at R2.5. The Sea to Summit Ultralite, sold at Bivouac for about $150 less, is 480g, more comfortable but just too bulky and heavy for the TA in my view. I like the concept of the Klymit Insulated V Ultralite SL, with its body supporting construction, but it is a bit heavy at 454g. Some manufacturers offer a women’s version of their sleeping pad, with extra width and possibly cushioning, at the hips. I find I roll off the Therm-a-Rest pad with its horizontal air baffles very easily. I wish that sleeping bags came with tags, like quilts, to tie them to pads. Or maybe the problem is that I use a short pad (the small version of the Therm-a-Rest NeoAir Xlite, at 218g) in order to save weight, since you don’t really need cushioning for your legs. Maybe my legs and feet contacting the ground push the mat around as I toss and turn?
A lot of sleeping mats now come with pumps or inflation sacs. These don’t just save you huffing and puffing, but also prevent your moist breath entering the mat and causing mould growth and/or loss of insulation (damp air being more conductive of heat than dry air).
The alternative to air mattresses are the cheaper but less comfortable and less insulating closed-cell foam pads that have been used by generations of hikers. The Therm-a-Rest Z-lite SOL folds nicely in concertina fashion to strap easily to the outside of a pack, but is still heavy at 410g. Macpac has a similar one.
Which is best to take, an inflatable mat or a closed-cell one? If doing the North Island TA I would spend the money and get the NeoAir Uberlite or XLite (350g, R4.5), or the vastly cheaper Rab Ultrasphere 4.5 (370g, R4.3), as there is a lot of camping. But if only doing the South Island I would save a pile of money and accept some discomfort for the relatively few nights I might be camping and get a roll mat (depending on my plans after the TA of course). OR, maybe consider just toughening up and sleeping on bare ground! My parents tramped a lot, and there were no mats at all in their day and huts were often without mattresses. My mother recalled fellow trampers who couldn’t afford sleeping bags carrying woollen blankets and stuffing newspapers inside their clothes to keep warm at night. How soft we have become!
Hiking Poles
Kiwi trampers are gradually adopting these, often carrying one pole, but a pair of poles is essential for long-distance walking like the TA. They allow you to go faster, provide more stability on uneven ground, stabilise you on slippery patches and reduce the impact on your joints when going downhill. They can also be used for supporting tents, whacking cattle, parting blackberry and gorse, probing the depth of murky streams, supporting easy stream and river crossings, fending off hostile trampers(!?) and probably other uses I’ve not yet thought of. The twist-to-lock method of adjusting length is said to be less secure and harder to adjust than the lever sort but tends to result in a lighter pole. Carbon fibre sounds good in theory, but these poles are often heavier than the aluminium ones, and can break, whereas aluminium just bends and can be hammered back straight with a rock or hut axe.
You don’t have to buy one of the expensive brands, though some of these do come with cork handles, which is apparently very nice to hold. The low-cost Fizan Compact from Kathmandu, for example, is one of the lightest around, coming in at 170g/pole, and is highly adjustable in length. It is beaten for weight by the Black Diamond Distance Carbon Z at about 150g/pole for the 120cm length, but that costs roughly twice the price of the Fizan and 20g is neither here nor there. I’ve done about 3,000 km on my Fizans, and they are still going, though I’ve had to hammer out some bends caused by my falling over a few times. The Black Diamond is a very nice pole, with better grips than the Fizan, better strap adjustment, smaller packed length, and faster set-up, but it isn’t adjustable and won’t be as robust. Adjustable length isn’t a deal-breaker, but it can be handy when you are going up or down a long hill so that you can change the height of the pole accordingly. And if you are using it as a tent pole it gives you an extra adjustment. Obviously, you should check that the optimum recommended pole length for your tent matches your walking pole before you buy either.
Back to Black Diamond, Outdoor Gear Lab (ODGL) have recommended the Distance Carbon FLZ over the plain Carbon Z as more robust and adjustable, but it is heavier, at about 190g/pole. A very light pole is the Gossamer Gear LT5 (141g) but ODGL say it is ‘too delicate for backcountry use’. They would probably say the same about the Mountain King Ultra Sky Runner Ultra Carbon, a phenomenally light 104g/pole at the non-adjustable 115cm length. Such poles are intended for ultra-distance running over fairly even ground.
When choosing a pole make sure it is the right length: bend your arms at right angles at the elbow and your hand should then grip the handle. That’s the length to set it up each day too. And when using them, rest your wrist on the strap. Google ‘using walking poles’ for more on effective technique. And if you need a smaller pole, note that some manufacturers make poles designated for women. They come in shorter lengths and have smaller hand grips (and presumably would be more suitable for children as well).
Cooking
Stoves – Gas or Alcohol?
Most TA hikers have some sort of gas stove. They are quick to set up and get going and burn with a hot, strong flame. The lightest, cheapest and most compact way to go is to get one of the small screw-in burner heads. You can get titanium ones that weigh about 60g. Your weight then is just the additional weight of the gas and the bottle. Make sure you unscrew the stove burner after use, as the tap can be knocked to the ‘on’ position in your pack and drain the cylinder (it happened to me!) I wouldn’t bother with a Jetboil outfit – too heavy, too bulky.
A problem with gas is knowing how much gas you need, and at any given point, how much is left. With some previous experience you can work out how many burns you can get out of a given size bottle to boil your usual quantity of water. Then, as you go, scratch a mark each time you burn the stove so you know how much you have left before you need a new bottle. This is an inexact business however, and you can easily get caught out. Then there is the question of where you can get a new bottle. Invercargill, Te Anau, Queenstown, Wanaka and maybe Twizel are certain sources, but it’s hard to guarantee there will be a bottle in stock of the size you want in places like Arthur’s Pass or St Arnaud, and you may be pushed to find them between Auckland and Kaitaia. So you may have to carry much more than you really need.
Another option is an alcohol stove. These are lightweight, you can see exactly how much fuel you have left, are cheap to run, and you can buy the fuel almost anywhere there is a store or petrol station. In NZ you want methylated spirits, also known as meths (but you are unlikely to get much joy if you ask the storekeeper for meth, singular, as that’s something else in NZ!) It is coloured purple to identify it and has a foul-tasting additive to prevent you drinking it. Make sure you keep your meths stove in a plastic bag when it’s in your pack, as any slight seepage of residual fluid into your cookware or food will make it taste truly horrible. Methylated spirits is usually sold in a one-litre container, far more than you want to carry, so you will have to put it into something smaller and throw the rest away (or better, carry it all to the first hut and leave the surplus for someone else). But again, make sure none seeps out inside your pack (in another out-of-fuel mishap I lost a whole lot of fuel this way when an insecurely screwed bottle went upside down in my pack – maybe two small bottles are an insurance against this, and definitely store them in an exterior pocket).
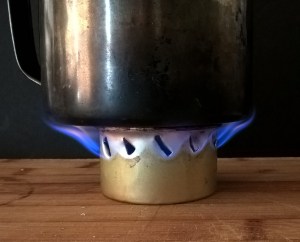
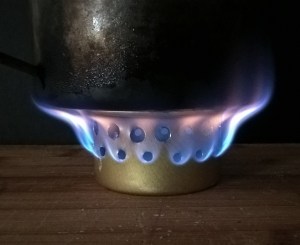
Alcohol stoves are not commonly available in stores in NZ. But you can make your own. I was astounded to meet a TA walker who had fabricated one by simply slicing slits with a knife all the way round the top of a tuna can. I made one myself like this and found it worked like a charm, though it was trickier to use than gas, and it had an issue of being unstable with a pot-full of water on top. I suffered the embarrassment in a crowded hut of the contraption falling over and flaming meths sweeping across the benchtop along with my dinner. Fortunately burning meths is easily extinguished with water and my dinner mostly achieved that. Still, the stove itself only weighed 7g and used about 25ml (20g) of meths to boil 600mls of water. You can make a more professional and probably effective version by drilling the holes. Start with the smallest tuna or cat food tin you can buy. New World supermarkets have the Pams brand of tuna cans, as well as Fancy Feast cat food, both of which are perfect.
Note that a drawback with alcohol stoves is that they need a wind shelter outdoors because their flame is not strong. Some say that their use outdoors when there are fire restrictions (which apply for most of the South Island in summer) is prohibited as they are a naked flame. You could argue the same for gas stoves, but admittedly the chances of an alcohol stove falling over, being blown away, or flaring out are greater than for gas. Anyway, in either case you should make sure your stove is used away from dry grass, etc.
Another stove option is solid fuel tablets such as Esbit. They are useful in an emergency, and have the same advantage of alcohol that you know exactly how much fuel you have. But you need a pot stand and something to burn the tablets on, and sources of the tablets can be hard to find. The fumes from burning them are also unpleasant and possibly poisonous, so they are best suited to outdoor use. The Bivouac shops in the four main cities have them sometimes, and you may find them in hunting and fishing stores in smaller centres. And finally, amongst alternatives to gas stoves are wood chip burners. A bit heavy and bulky perhaps, but you don’t need to carry fuel (though remember that New Zealand bush is not described as rain forest for nothing, so you could struggle to find dry wood). You can make wood chip burners yourself, too.
In summary, the real weight of a stove is best considered as a combination of the stove itself, plus fuel, plus fuel container, over time. Rather surprisingly, Thru-Hiker found that the Esbit solid fuel tablets came out best for weight/day, and a cat food meths burner and a gas canister with screw-in burner to be about equal after both 14 and 28 days.² But I would suggest that you will always be carrying more gas (and gas canister) than you really need in NZ for the reasons of difficulty in estimating remaining gas usage and unpredictability of replenishment mentioned above.
Cheap Lightweight Pots – You Heard it Here First!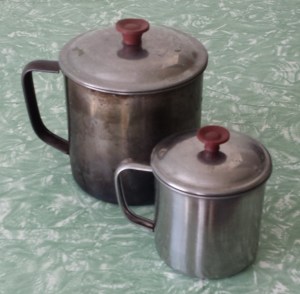 If you follow my practice and only use a pot to heat water (or food in that water) to a boil, then one pot is all you need, and in fact you may as well use it to do double duty as a mug. Now, you could buy a titanium mug, but here is an ultra money-saving idea: cheap stainless steel kitchenware of the sort sold in Asian stores is occasionally made of such thin metal that its weight is the same as the sort of titanium mug/pot sold in tramping stores. Don’t believe me? My 850ml stainless-steel mug that I’ve used for years and which has no dents or deformation weighs 120g. It cost me less than $5. A Toaks 800mm titanium mug/pot weighs 112g, and costs $68 (sale price, plus freight from Gearshop). The only advantage of the titanium pots is that the handles fold away, making packing easier.
ELECTRONICS
GPS
Nice to have, but if you take paper maps, a compass, and have the TA app on your cellphone (with its inbuilt GPS location finding) you should be right. I mainly used the GPS on my cellphone to find out how far I was from the hut towards the end of a tiring day and never once got out my compass, though that doesn’t mean you shouldn’t carry one. If the weather is murky and you can’t see the marker poles, and the ground trail is not well-defined (common in many open country sections), you may need some sort of GPS system. And when it’s cold, wet and windy, you might find that fiddling about with a cellphone to get a position fix is just too hard. In the interests of cost and weight savings though, I would favour a smartphone over a dedicated GPS device. I suspect few TA hikers carry a special GPS device these days.
Cellphone
A smartphone is pretty useful for its ability to carry back-up maps, downloaded documents like the guides on this site, a GPS, web access for checking weather forecasts and booking accommodation, keeping in touch with other people on the trail as well as the folks back home, taking photos, and oh, making phone calls. However, screen time and high brightness, wifi, cell signal, continuous GPS use, and photography in particular really drain your battery. (Bluetooth doesn’t though, unless it is in use for sending music to your earphones.) You can maximise battery life by only turning functions on when needed, keeping your phone in flight mode when out of range, and maybe using a battery-saving app. Being in flight mode really cuts down battery drain. If you don’t want to turn flight mode on in areas with cellphone reception you can at least switch wifi off if there is no wifi, as that’s another battery drainer. You can always run a test with your phone over several days before you go, using the GPS a few times and taking a dozen photos with flight mode on to see what % of battery is used. There are numerous sites on the web offering advice on saving battery power. Here is one for iPhones, and one for Android.
The ever-increasing weight, size and price of cellphones is a pain for the lightweight hiker. Unihertz’s crowdfunded Atom is built for outdoor pursuits and is small and rugged, but fairly heavy. however, they also have the small and lightweight (110g) Jelly model. Older phones tend to be lighter, mainly because they are smaller. Examples are the Samsung Galaxy S4 mini (107g!), S5 mini (120g), S4 (130g), iPhone SE (113g – the original, not the 2020 remake), and iPhone 6 (129g). The iPhone SE has only a 4-inch screen and the S4 mini, 4.3 inch. But the iPhone 6 and Galaxy S4 are larger at 4.7 and 5 inches respectively. An issue is what version of Android or iOS the phones are running and what the Te Araroa – The Trail App and FarOut apps need (Te Araroa minimum Android 7.0, or iOS 15.6; FarOut minimum Android 8.0 or iOS 18.0, though it runs fine on my iPhone SE 2016 with iOS15.6). The S4 mini only goes to Android 4.4.2, and the S4 to 5.0.1 which counts out the apps on these phones. You can upgrade such phones with the ‘de-Googled’ open-source /e/OS, but I can’t vouch for the resulting experience or whether it will support the hiking apps.
I’m starting to veer towards the iPhone 13 mini (141g) now. It is a jump up in weight from some of the above phones, but it is more recent technology, has good battery life, and it is the last lightweight phone that Apple is likely to make (unless you count the very expensive iPhone 17 Air at 165g). Best to get one with a newly replaced battery though.
Many people these days use rechargable battery backup packs, but these weigh about as much as an entire cellphone. Much lighter and sometimes cheaper is simply a spare battery, but only older phones like the Galaxy phones mentioned above will allow you to swap it out easily in the field (and not the iPhones). The other alternative, solar charging, sounds like a good idea but is yet to be fully practicable in terms of weight. I believe that keeping your phone cool is good for getting maximum charge when you charge it, and for holding the charge. So don’t tuck it under a pillow when charging or leave the phone exposed to the sun at other times.
Recent phones can have much better battery life than older ones, but you pay for that with heavier phones. GSM Arena have a ‘best battery life’ webpage. The Galaxy M51 does well, at 156 hours but it weighs 213g. Still, that may be lighter than carrying a battery pack plus phone. The Xiaomi Poco M3 has a similar rating but is a bit lighter, and the Realme 6i has a whopping 186 hours life, but is not considered a great phone otherwise (neither may be available for sale in NZ).
Cellphone reception is, of course, mostly non-existent in backcountry areas. There are three cellphone networks: Spark, One NZ and 2 Degrees. Other providers, such as Skinny, Kogan, Slingshot or Warehouse Mobile, just use one of these networks. It is difficult to say which network is best for TA walkers. They have network coverage maps but how reliable they are could another story. If the maps are to be believed then 2 Degrees has most coverage, though Spark has traditionally been better in country areas and is currently rolling out mobile broadband to such places. Expect poor coverage in any area away from population centres in the South Island. Much of the North Island TA route is covered, with exceptions being the Tararuas, the Whanganui River Road and the river itself, and Ninety Mile Beach.
There are plans to provide coverage across highly visited National Parks, including the Tongariro Crossing and Nelson Lakes National Park, for safety reasons, but I’m not seeing anything on coverage maps of 2025. Also, One NZ is using the Space-X Starlink satellite network now, but only on phones with the latest iOS or Android operating system and only on eligible mobile plans. One NZ have a list on their website of phones that will potentially work with satellites. Satellite reception gives 100% coverage of the entire country, but currently only allows text, certain apps, and short voice messaging in addition to calls to 111. Other providers will probably begin using satellites sooner or later too. Two Degrees has plans for 2026. I have mixed feelings about all this – clearly satellite connection is great for emergencies, but it is kind of nice to be out of range. Is wilderness really wilderness anymore when you are connected to the rest of the world? Also, there is a problem with the swarms of tens of thousands of satellites proposed by Starlink and probably other systems – astronomers are complaining that observations of the sky are being ruined by them.
If you are coming to NZ to do the TA then the NZ Pocket Guide has some useful advice on switching to a NZ service.
Personal Locator Beacons (PLBs)
If you are on your own and you fall down a bank, or worse, who is going to find you? PLBs are expensive, but what is your life worth? There are important differences in the types of beacons. The popular and cheaper SPOT device is essentially an activity tracker and needs a relatively clear horizon to transmit a message to a satellite. Apparently in NZ the satellites it uses orbit closer to the horizon, so there is less chance of a signal being received. PLBs work by transmitting an emergency signal only when you activate them, and work with higher orbiting satellites. A good rundown on the difference between a PLB and an activity tracker is provided by Andrew Burfield in the TA Facebook archives. Outdoor Gear Lab also explains the differences and recommends some models, though you would have to be sure these will operate in NZ. New Zealand coded 406MHz PLB beacons are legally required to be registered in NZ. This enables searchers to know who you are and have some information about you, including your emergency contact people if your beacon is activated, which just might help save your life. So if you buy a beacon second hand you should re-register it under your name. You can register it at the Rescue Coordination Centre’s beacons.org.nz, plus find plenty of information about beacons there
e-readers
An e-reader weighs between 160 and 220 or so grams, about the same as a lighter-weight paperback book, though with a book you can always tear out the pages as you go, reducing its weight over time. But e-reader can hold hundreds of books, has its built-in reading light, is usually waterproof, and holds a battery charge for a remarkably long time. You can even add your own text files to it. To add my guides to one, cut and paste the content from the webpage to a word processor like Word. Delete any images, save the file, and then use an online file converter to convert the file to epub format. You download the result to your computer and then copy the file to the e-reader via a USB cable. You can also simply copy pdf files to a reader, but having the file in epub format makes it much easier to read. Kindle readers are locked into the Amazon ecosystem, but Kobo and Boox devices are not limited in this way. With Kobo you can borrow books from most NZ libraries..
Minor Items
Zip-loc Bags
These are handy for food items and other uses, but the ‘free’ ones you use to buy nuts and dried fruit at supermarket bulk bins are not very robust. The zips tend to fail and the bags get holes in them with repeated use. Better to pay the money and buy better quality bags. You could consider twin-zip bags such as the Hercules brand available from Woolworths supermarkets in Australia, but while the zips are good, they also get holes in the plastic. My preference is now the heavier and stiffer ones you get pre-packaged granola and other products in. A step further up are the very rugged and somewhat rigid Kai Carrier bags which have incredibly well-sealing zip locks. Either are good for putting your electronics in, as well as critical clothes, books, maps, first aid, etc. Consider paper bags too. Clearly not waterproof, but OK for containing food within an outer plastic bag. They have the advantage that you don’t end up carrying a whole lot of empty bags out with you as rubbish, as you can leave them behind in huts for starting fires. And you avoid adding more plastic to the planet.
Water Bottles
Another thing you can’t buy in NZ is Glacéau Smartwater or Balance spring water. The 1L bottles are ideal for backpacking in my view as they come in long, slim bottles, making them easy to slip down the side of your pack. So far as I can see you can only buy 12-packs of Smartwater online in Australia and NZ. Balance flavoured water is available at Coles and Woolworths as singles though (but not in NZ). Don’t bother with metal water bottles or even Nalgene plastic – way too heavy.
For Bodily Excretions
You might like to consider a bag in which to put used toilet paper for those moments when you have to go in the bushes. Toilet paper takes a surprisingly long time to break down and there is nothing more off-putting than coming across an area strewn with toilet paper. And it gives hikers a bad name. The alternative is burying it properly, and you will need to do this with your poo of course. You can buy trowels designed for the purpose, such as the Sea to Summit one available from Bivouac and Macpac in NZ at 87g, or Coghlans Backpackers Trowel at Hunting and Fishing NZ at 55g, and vastly lighter ones again at Coffee Outdoors and overseas (search for ‘camping trowel’ or ‘backpacking trowel’). Their handles tend to cut into your palm though. A lightweight alternative, and also useful for securing a tent in loose soil, might be a large, convex tent peg. Remember to do your business well away from streams to prevent spreading gut infections.
For peeing, there is the pee bottle to consider for those who have to get up in the night – if you are busting to go and you are in a tent on a cold and rainy night you will be grateful to have one. A wide neck and opaque coating (for discretion) are what you want in a bottle. Look in the dairy drinks department in supermarkets. I’ve seen another suggestion that you use one of the zip lock pouches used for rehydrating commercial dehydrated meals (like Backcountry Cuisine) as they will stand up on their own, reducing the chance of the zip leaking. I’m not sure about this. Yes, they are very lightweight, take up no room in your pack, and are possibly easier to use than a bottle, but you don’t want that zip leaking if the bag falls over. Not so easy to ensure in a tent unless you pop it outside, but probably OK in a hut. If you do want a compact solution then Camelbak make collapsible water bottles with very wide mouths, though they are expensive. It is all more difficult for women of course, but you can now buy funnel gadgets in hiking shops that help. These are mainly intended for stand-up peeing. The Shewee is well known and you can buy it at Bivouac. (By the way, contrary to popular opinion, urine is not sterile, so think twice about drinking out of a rinsed pee bottle.) Pee rags are another thing to consider as an alternative to toilet paper. The pros and cons seem well discussed here. If it has a hanging tag you can rinse it in a stream or whatever and attach it to your pack to dry out as you walk. And guys, if you are going to be using a pee bottle, shaking the drips isn’t an option, so you will probably want one of these too. Finally, menstrual cups are something else to weigh up for women.
Equipment Suppliers
Suppliers in New Zealand include the Australasian outdoor chain stores Kathmandu and Macpac, with branches in many cities and their own branded gear, plus Torpedo 7 (now being rebranded as The Outlet stores), Bivouac and Outside Sports (stores in Te Anau, Queenstown, Wanaka only). There are also the online stores Earth Sea Sky (who make their own gear, some of which is carried in other stores) and Gearshop. Many smaller towns also have hunting and fishing stores which carry hiking gear, but it tends to be the heavier variety. And the Rebel Sports chain sell trail runners, often at sale prices.
There also seems to be a crop of new independent stores emerging recently. Some may be just an internet conduit for overseas purchases. I’m thinking of NZ Outdoors here. But Further Faster, Earth, Sea Sky (both Christchurch), Living Simply (Auckland), Dwights Outdoors (Upper Hutt and Wellington), Gordons (Wellington), plus a number of independent stores in Wanaka and Queenstown have actual items in stock, and Intents Outdoors has a warehouse in Auckland for ‘click and collect’. Pack Gear Go is an outfit near Nelson airport selling imported lightweight and regular gear. Finally, Coffee Outdoors is a physical and online store in Wellington’s Marion St, offering free coffee and expensive but really excellent lightweight gear by Montbell, Pa’lante, Klattermusen, and Durston that you won’t find in many other NZ outlets. They also have Arn packs.
On top of these independent stores are a growing number of people making lightweight gear right here in New Zealand. It may seem expensive, but no more so than importing gear from the USA, and very often things can be custom-made. Kiwi Ultralight, for example, is an online cottage business making quilts and packs. Fiordland Packs is another very small-scale manufacturing business, making lightweight, entirely customisable packs, as are Southern Lite Packs. Earth Sea Sky, mentioned above, have been manufacturing their own clothing since 1990, and it can be found at some other stores as well as their own (and their annual pop-up sales around the country).
There is always the well-respected US Outdoor Gear Lab and SectionHiker for reviews of clothing and equipment, though you will have to put up with reading about gear you can’t buy in NZ stores. However, if you live in the USA you are in a haven for ultralight gear and you would be best to do your shopping there. Even fairly regular gear will be more expensive in New Zealand. The price of footwear in particular often gives our American visitors a shock. And if you are in Australia, Backpacking Light in Melbourne imports some lightweight American gear such as Gossamer Gear and Hyperlite packs. Also, as previously mentioned, Orange Brown is a company in Australia making lightweight packs and bags.
1. ‘Effects of pack weight on endurance of long distance hikers’ by Anthony T Thomas, Embry-Riddle Aeronautical University, Daytona Beach, 2013. Available online at Scholarly Commons.
2. This is confirmed by my own tests. The alcohol stoves pictured above use 20g of fuel (25ml) to boil 600ml of water at a starting temperature of about 20 degrees C. The gas stove described with a screw-on burner uses just 10g of gas. But for the smallest type of gas canister (110g gas), you are also carrying about 150g of metal canister and burner. You get about 10 boils out of this. So average weight over time for the two types of stove is actually about the same. You start out carrying more with an alcohol stove because you have to carry more fuel, but the weight decreases as you use the fuel (since the weight of the stove and the fuel bottle alone are minimal), but with gas you are still carrying the 150g weight of the canister even when you’ve run out of gas. Also, the alcohol stoves pictured are primitive, and probably not very efficient compared to some better models that are likely to use less fuel per boil.
Last updated 9 January 2026
